Home
Home  Navigation


In the thrilling world of *Monster Hunter Wilds*, sheer power isn't always the key to victory. With enough speed and strategic positioning, even the mightiest monsters can fall to your swift attacks. Enter the Dual Blades—a weapon set that excels in rapid, successive strikes. Here’s how to harness the full potential of Dual Blades in *Monster Hunter Wilds*.
Dual Blades in Monster Hunter Wilds
Rapid and deadly, Dual Blades are the epitome of agility and versatility on the battlefield. Mastering their various modes will equip you to handle any combat scenario with finesse.
All Moves
| Command | Move | Description |
|---|---|---|
| Triangle/Y | Double Slash/Circle Slash | Initiate your combo with a Double Slash by pressing Triangle/Y, then follow up with another Triangle/Y to execute a Circle Slash. |
| Circle/B | Lunging Strike/Roundslash | A forward slashing attack; use the analog stick to direct your advance. Press Circle/B again for a Roundslash. |
| R2/RT | Demon Mode | Activate Demon Mode for enhanced attack power, movement speed, and evasion. You'll also gain immunity to knockbacks. |
| Triangle/Y + Circle/B (In Demon Mode) | Blade Dance I, II, III | Unleash powerful attacks that can be chained together in Demon Mode, consuming the Demon Gauge as you go. |
| Triangle/Y + Circle/B (In Archdemon Mode) | Demon Flurry I, II | Execute a series of swift attacks exclusive to Archdemon Mode, which also consumes the Demon Gauge. Use the analog stick to steer your strikes. |
| Cross/A (During Demon/Archdemon Mode) | Demon Dodge | In either mode, press Cross/A for a swift dodge. A Perfect Evade allows attacking during the dodge and grants a short-term damage boost. Demon Dodge doesn't consume the Demon Gauge in Demon Mode. |
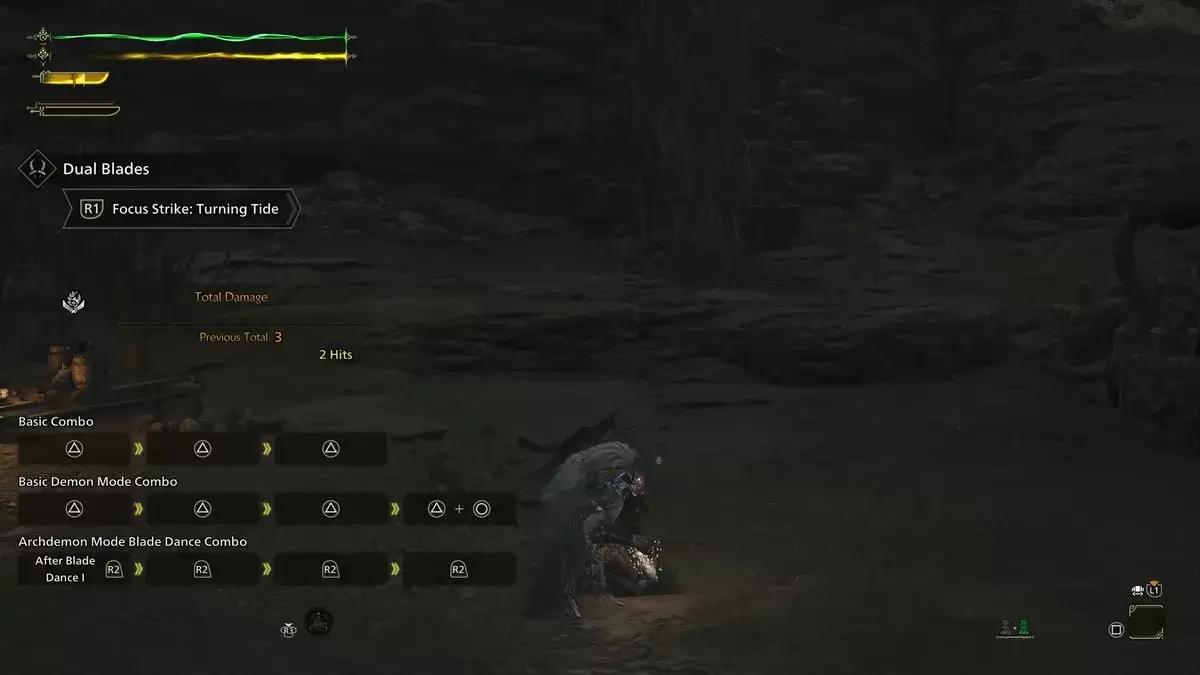
| L2/LT + R1/RB | Focus Strike: Turning Tide | Deliver a slashing attack targeting wounds. Hitting a wound triggers a Midair Spinning Blade Dance, capable of destroying multiple wounds across the monster's length. |
Demon Mode/Demon Gauge and Archdemon Mode
The Dual Blades feature a unique gauge mechanic. Enter Demon Mode to enjoy boosts in attack, movement speed, and evasion, along with knockback immunity. However, this mode continuously drains your stamina, ending either by manual deactivation or when stamina hits zero.
As you land hits in Demon Mode, the Demon Gauge fills up. Once full, you transition into Archdemon Mode, where the gauge depletes over time but can be used for powerful attacks that consume it. Both modes can be utilized interchangeably, and mounting a monster will halt the Demon Gauge's depletion, giving you strategic flexibility.
Demon Dodge
Following a Perfect Evade, enter an empowered state with Demon Dodge, which enhances regular and elemental damage, allowing you to attack while dodging. This move provides a 12-second damage buff, with subsequent dodges dealing damage as you spin forward.
Combos

The Dual Blades' combos revolve around leveraging Demon and Archdemon Modes to maximize damage output.
Basic Combo
Initiate a simple yet effective combo by pressing Triangle/Y three times. This sequence delivers a Double Slash, Double Slash Return Stroke, and a Circle Slash, ideal for various combat scenarios.
Alternatively, use the Circle/B sequence for a Demon Flurry Rush – Spinning Slash – Double Roundslash combo to quickly fill your Demon Gauge.
Demon Mode Basic Combo
In Demon Mode, your basic combo becomes more potent and faster. Start with Demon Fangs, followed by Twofold Demon Slash, and Sixfold Demon Slash, culminating with Triangle/Y + Circle/B for Demon Flurry I.
Archdemon Mode Blade Dance Combo
Once your Demon Gauge is full, switch to Archdemon Mode for intense, rapid damage. Begin with Blade Dance (Triangle/Y + Circle/B) in Demon Mode, then press R2/RT four more times for Demon Flurry I into Blade Dance II, finishing with Demon Flurry II and Blade Dance III. This fluid transition between modes will unleash significant damage on your target.
Related: How to Capture Monsters in Monster Hunter Wilds
Dual Blade Tips
Mastering the Dual Blades requires seamless transitions between modes, maximizing damage potential.
Always Follow Up
Start with the basic Demon Flurry Rush combo (Circle/B + Circle/B + Circle/B), then transition into a full Demon or Archdemon Mode combo with three sets of Triangle/Y + Circle/B. This approach fills your Demon Gauge and swiftly converts it into high damage, a feat unmatched by weapons like the Great Sword.
Keep Your Stamina Up
Demon Mode relies on your stamina, so maintaining ample reserves is crucial. While you can exit the mode to recover, exploiting wounds with Focus Strike conserves stamina during the attack while still filling the Demon Gauge, readying you for more aggressive assaults.
Dodging in Between Attacks
With no defensive options, dodging is your lifeline. The Dual Blades offer superior mobility, allowing you to dodge out of most attacks and combos. Patience is key—wait for the right moment to strike rather than committing prematurely.
Ensure Sharpness
The relentless strikes of the Dual Blades quickly deplete weapon sharpness. Incorporate the Speed Sharpening skill into your build to minimize downtime and swiftly return to combat.
For more tips and guides on Monster Hunter Wilds, keep exploring The Escapist.
Monster Hunter Wilds is available now on PlayStation, Xbox, and PC.
 Latest Articles


 Latest Games